はじめてのSymfony4 + Vue.js
Vueコンポーネント
チュートリアル対象バージョン
- PHP 7.2.5
- Symfony 4.1.1 [packagist]
- vue 2.5.16 [npm]
- webpack 3.12.0 [npm]
- @symfony/webpack-encore 0.20.1 [npm]
Vueコンポーネント
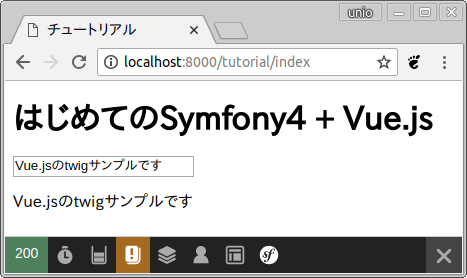
Vueではボタンやテキストフォームといった部品を コンポーネント にして再利用することができます。 ためしに前回作成したテキストフォームをコンポーネント化してみましょう。 コンポーネントの作成には、 Vue.component 関数を使います。
assets/js/tutorial.js
                    import Vue from 'vue/dist/vue.esm.js'

                    Vue.component('text-field', {
                        data: function () {
                            return {
                                message: 'Vue.jsのtwigサンプルです'
                            }
                        },
                        template: '<div><input type="text" v-model="message"><p>{{ message }}</p></div>'
                    });

                    new Vue({
                        el: '#target-container',
                        data: {
                            title: 'はじめてのSymfony4 + Vue.js'
                        }
                    });
いままでtwigにHTMLとバインド構文を書いていましたが、Vue.componentでは template を使うことで同様の機能を実現できます。 関数の第一引数はコンポーネント名で、HTMLのカスタム要素名となります。 コンポーネント名はケバブケース(hoge-piyo)もしくはアッパーキャメルケース(HogePiyo)のどちらで記述しても、 DOM内ではケバブケースでカスタム要素を記述できます。
assets/js/tutorial.js
                    Vue.component('text-field', {
                        data: function () {
                            return {
                                message: 'Vue.jsのtwigサンプルです'
                            }
                        },
                        template: '<div><input type="text" v-model="message"><p>{{ message }}</p></div>'
                    });
第2引数にはVueインスタンスに渡すことのできるオブジェクトを同じように設定できます(data、methods、computedなど)。 ただし、dataは関数にしないとコンポーネント毎の独立したプロパティにならないので注意してください。 dataを関数にしなかった場合の挙動は 公式サイト に詳しく記載されています。
templateは必ず1つのルート要素で構成されます。 トップレベルで2つ以上のタグが記述されているとコンパイルエラーになります。
template: '<input type="text" v-model="message"><p>{{ message }}</p>'
このように、divタグで囲むことでエラーがでなくなります。
template: '<div><input type="text" v-model="message"><p>{{ message }}</p></div>'
twigにはVue.componentで作成したカスタム要素 <text-field> を記述します。
templates/tutorial/index.html.twig
                    <!DOCTYPE html>
                    <html>
                    <head>
                        <title>チュートリアル</title>
                        <script defer src="{{ asset('build/vueapp.js') }}"></script>
                    </head>
                    <body>
                    <div id="target-container">
                        <h1 v-text="title"></h1>
                        <text-field></text-field>
                    </div>
                    </body>
                    </html>
webpackの実行後に、ビルトインウェブサーバを起動して画面を確認してみましょう。
コンソールコマンド
                    yarn dev
                    bin/console server:start
単一ファイルコンポーネント
コンポーネントの雰囲気を掴んだところで、 次は 単一ファイルコンポーネント (Single File Components)を作成します。 SFCを書く前に、追加のパッケージをインストールします。
コンソールコマンド
yarn add --dev vue-loader@^14.2.2 vue-template-compiler css-loader@^0.28.11
| パッケージ | 概要 |
|---|---|
| vue-loader@^14.2.2 |
webpackのVueローダ Encoreの都合上webpack4系を利用できないのでv14系を指定 |
| vue-template-compiler | SFCのテンプレートプリコンパイル用 |
| css-loader@^0.28.11 |
webpackのCSSローダ Encoreの都合上webpack4系を利用できないのでv0系を指定 |
次にwebpack.config.jsでvue-loaderの設定を追加します。 Webpack EncoreにはラッパーAPIが用意されているので、 enableVueLoader() を1行追加してください。
webpack.config.js
                    var Encore = require('@symfony/webpack-encore');

                    Encore
                        ...
                        .enableVueLoader()
                        ...
                    ;

                    module.exports = Encore.getWebpackConfig();
vueファイルの作成
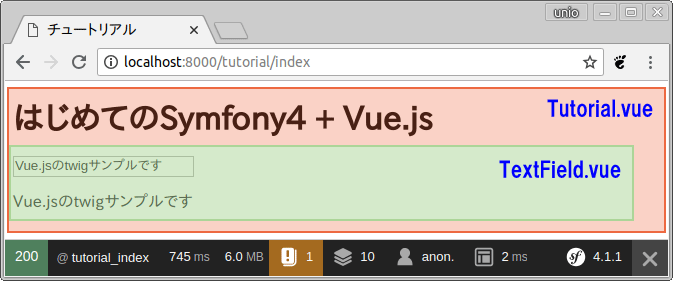
いままで作成したページをコンポーネントに分解してvueファイルにします。 ルートとなるSf4VueTutorial.vueと、その中にTextFiled.vueが入る構成を考えてみましょう。
まずは assets/js/vue/components/ にTextField.vueを作成します。
assets/js/vue/components/TextField.vue
<template>
<div class="text-field">
<input type="text" v-model="message">
<p>{{ message }}</p>
</div>
</template>
<script>
export default {
data: function() {
return {
message: 'Vue.jsのtwigサンプルです'
}
}
}
</script>
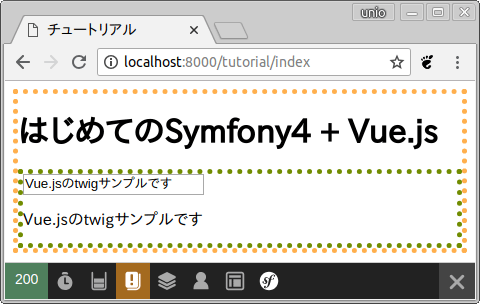
<style scoped>
.text-field {
border: dotted 5px #718C00;
}
</style>
vueファイルは <template> と <script> 、 <style> の3要素からなります。 styleに scoped をつけると、このコンポーネント内にのみスタイルが適用されるようになります。
次はSf4VueTutorial.vueを assets/js/vue/ に作成します。
assets/js/vue/Sf4VueTutorial.vue
                    <template>
                        <div class="root">
                            <h1 v-text="title"></h1>
                            <text-field/>
                        </div>
                    </template>

                    <script>
                        import TextField from "./components/TextField";

                        export default {
                            components: {TextField},
                            data: function() {
                                return {
                                    title: 'はじめてのSymfony4 + Vue.js',
                                }
                            },
                        }
                    </script>

                    <style scoped>
                        .root {
                            border: dotted 5px #ffaf4d;
                        }
                    </style>
script内で作成したTextField.vueをimportして、componentsにオブジェクトとして設定します。 componentsに登録したコンポーネントは、template内で自由に呼び出すことができます。 このように、複数のコンポーネントを組み合わせることで設計の柔軟性が格段に向上します。
最後にVueインスタンスを作成するjsとtwigを用意します。
assets/js/tutorial.js
                    import Vue from 'vue'
                    import Sf4VueTutorial from './vue/Sf4VueTutorial'

                    new Vue({
                        el: '#tutorial',
                        template: '<sf4-vue-tutorial/>',
                        components: { Sf4VueTutorial }
                    });
Sf4VueTutorial.vueをimportして、templateに <sf4-vue-tutorial/> を記述します。 これで #tutorial にSf4VueTutorialコンポーネントが描画されます。
templates/tutorial/index.html.twig
                    <!DOCTYPE html>
                    <html>
                    <head>
                        <title>チュートリアル</title>
                        <script defer src="{{ asset('build/vueapp.js') }}"></script>
                        <link rel="stylesheet" href="{{ asset('build/vueapp.css') }}"/>
                    </head>
                    <body>
                    <div id="tutorial"></div>
                    </body>
                    </html>
ここまでのファイルを用意できたら、webpackを実行してページを確認してみましょう。
次回はコンポーネントを使って、簡単な電卓アプリを作成します。